10 Tell-Tale Signs You Must See To Look For A New Patio Door Seals Replacement
Patio Door Seals Replacement Over time wear and tear or even underlying problems can cause the seals on patio doors to break and let cold air in homes. Replacing these seals is a simple project that can help homeowners save money on energy costs. Felt weather strip is cheap and simple to cut with scissors or a knife. It is available in various types and thicknesses, including pile strips made from different strands. Bulb Threshold A solid threshold acts as an efficient thermal bridge that transfers cold and heat between the inside and outside. This can result in drafts, high energy bills and even infiltration of bugs. Consider using a frost brake threshold that divides solid material with silicon or vinyl inserts to create physical divisions that disrupt the flow of warmth and cold. 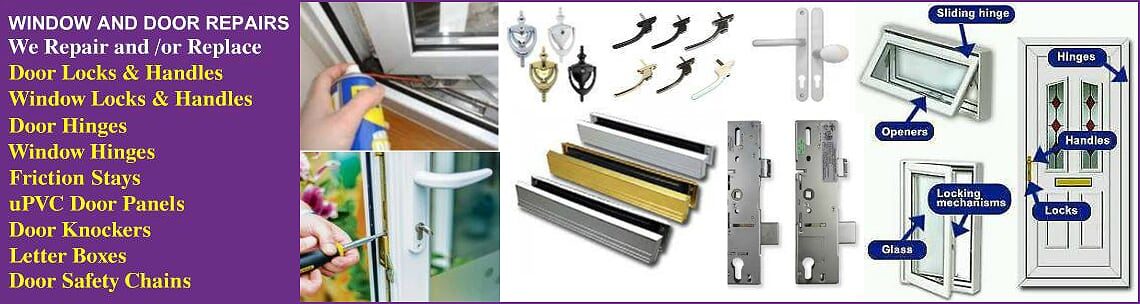 Although the threshold has historically been considered to be the death wet bulb temperature of 35 degrees Celsius however, recent research shows that it's actually lower. However, this wet bulb temperature can be risky for those who work outside or do not have access to indoor air cooling, as well as for seniors and anyone with chronic health issues. Place a candle or incense stick by the threshold of your patio door on a windy morning to see whether it's sealing correctly. If the flame or smoke is diverted to the side the threshold isn't sealing properly and needs to be replaced with weather stripping, which will create a tighter seal. A U-shaped sweep could be nailed or screwed to the door's bottom, compressing against the threshold when closed to stop drafts and shield against creatures and insects. Felt Felt is a fabric that is non-woven that can be made from either synthetic or natural fibers, and it's commonly used as the base layer for a door's weather strip. The fibers of felt are interspersed to create a thick, matted fabric that is water-resistant, durable and soft. It's also fire-resistant as well as insulation, making it an excellent option for a variety of applications. Typically the weatherstrip is placed between the doorframe and door, with the felt providing a tight seal that blocks drafts and air leakage. This is a concern for homeowners as well as cottagers particularly when the seasons change. Drafts and air leakage can result in large energy bills. This issue is easily fixed by replacing the weatherstrip on the patio door. The most commonly used weatherstripping for patio doors is “felt.” It is available in various sizes and thicknesses that fit inside any standard patio doorframe. It's a nonwoven fabric, unlike woven fabrics, that have wefts and warps. This means it will not break or lose its integrity when cut. Felt is also very dense and thick, making it a good insulation and soundproofing material. It is believed that felt was developed by nomadic tribes and remains an important part of a variety of cultures. In Mongolia it is being used to construct yurts, which is part of a tradition that goes back to thousands of years. Felt can also be used to create beautiful coats, hats and other crafts materials and even a rug pad. To install new felt begin by removing any existing weatherstripping from the doorframe using the screwdriver or utility knife and scraping away any remaining glue or adhesive. To remove dust and other debris using a damp cloth to clean the area around the doorframe. You can also use a mild cleaning agent such as ruby alcohol. You can make use of a measuring tape to ensure that the door's surface is clean and precise for the new weatherstripping. Repair My Windows And Doors have a weather strip at the frame edge that creates a tighter seal when the door is closed. Over time, the weather strip can get worn out or damaged. This allows air and moisture to enter the home, causing damage to flooring and furnishings. Replacing the weather strip will help prevent drafts, increase energy efficiency, and help protect stored items from the elements. A variety of materials are available for this project, from low-cost felt to high-performance polyurethane. When deciding on the material you use, you should consider the durability, longevity and the ease of installation. Self-adhesive tapes are a simple option for DIYers, whereas interlocking weather strips made from metal require more expertise and skill to install. Before you begin the project, examine the weather strip you used to see if there are indications of wear or degrade. If the seal appears worn or tattered it is recommended to replace it with a new one in order to maintain its effectiveness. Once the old weather strip has been removed, wipe down the area to get rid of any remaining “sticky goo” or adhesive residue that could impede the smooth and precise finish. The length and width of the doorframe should be measured precisely to ensure that it is a good fit for the new weather strip seal. Cut the new weather strip with a sharp utility knife or scissors, following the edge on a piece of paper as a reference. Make sure that the cut is clear and straight A sharp or angled cut can cause an ill-fitting door seal. Test the new weather strip with care when it is installed. Close and open the door a few times to ensure that it creates a secure, watertight seal at all corners and sides. Seal any holes or gaps with caulk that is outdoor-rated. This step should be carried out at night, after the sun sets and the door is shut and secured. A family member or friend can shine a flashlight around the door's perimeter. If you see any light shining through, the door's weather strip is in need of repair or adjustment.